Once you have a registered root namespace, you can create up to 3 levels of subnamespaces to organize your assets.
Complete registering a namespace guide.
Register a namespace with an account.
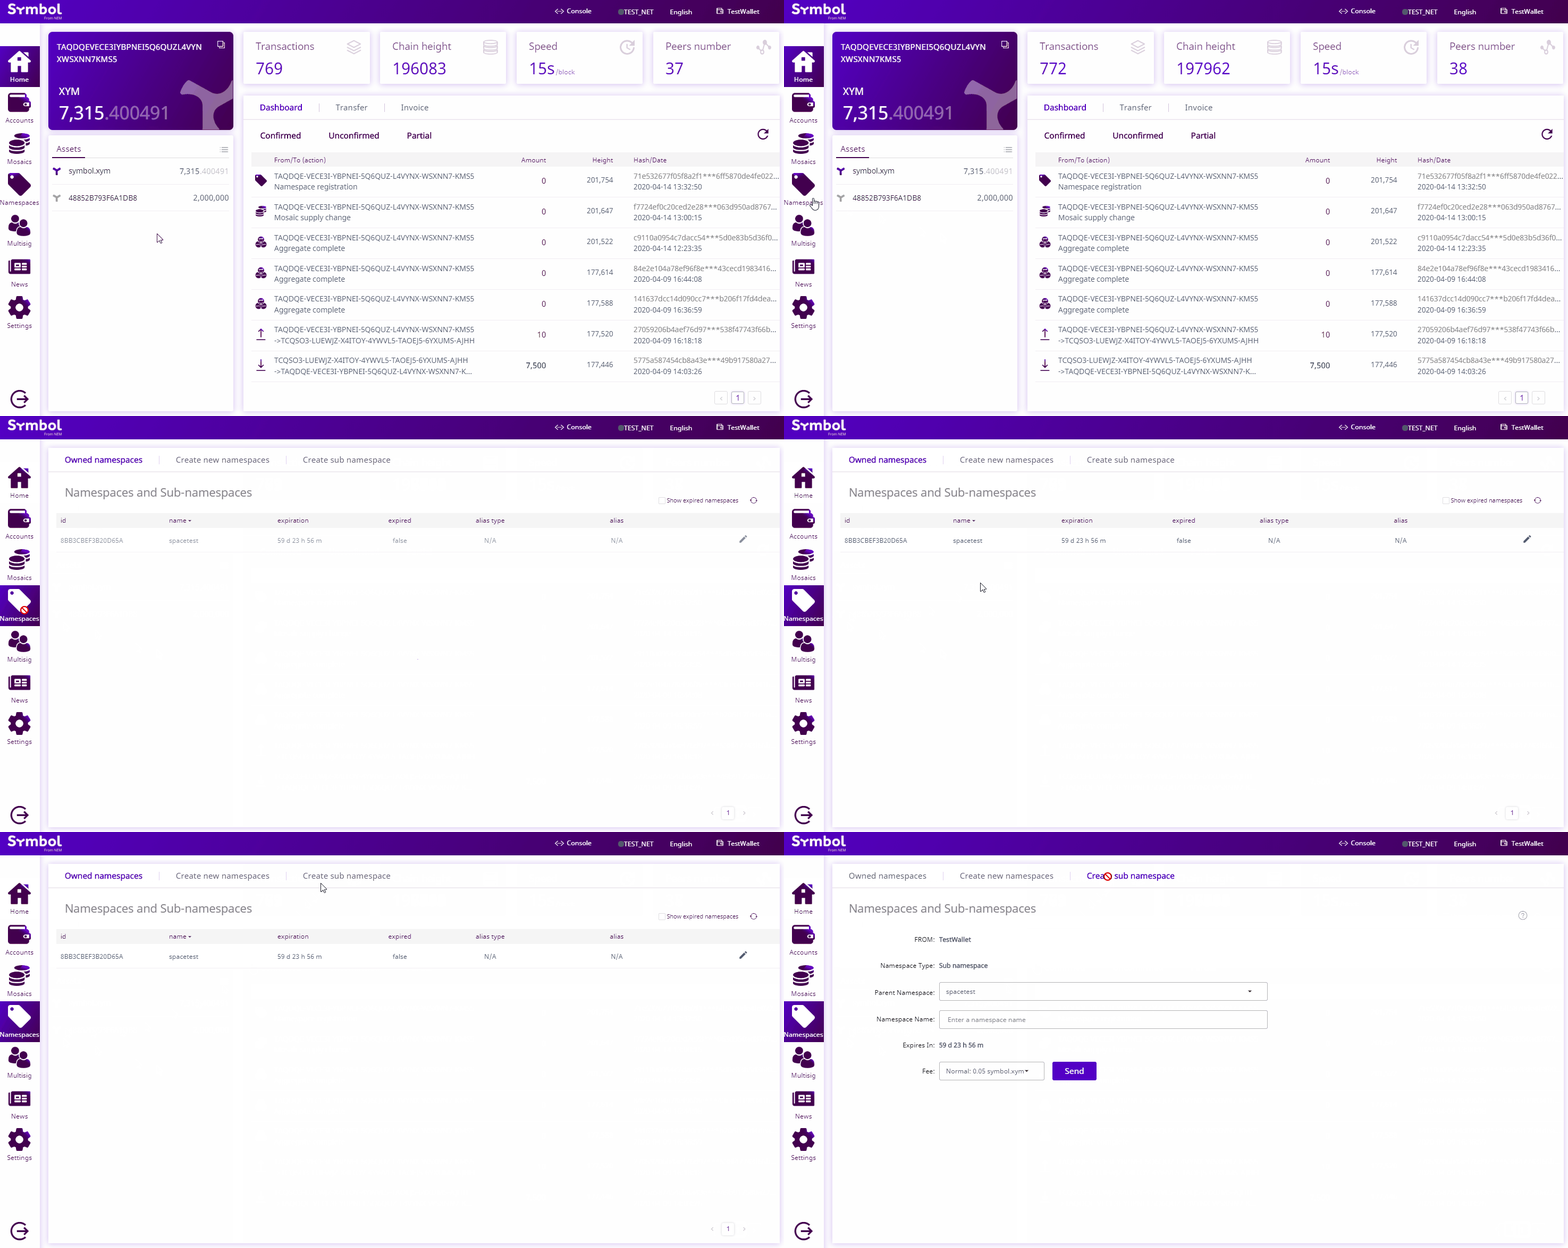
Click on “Namespace” on the left-side menu. Go to the “Create subnamespaces” tab.

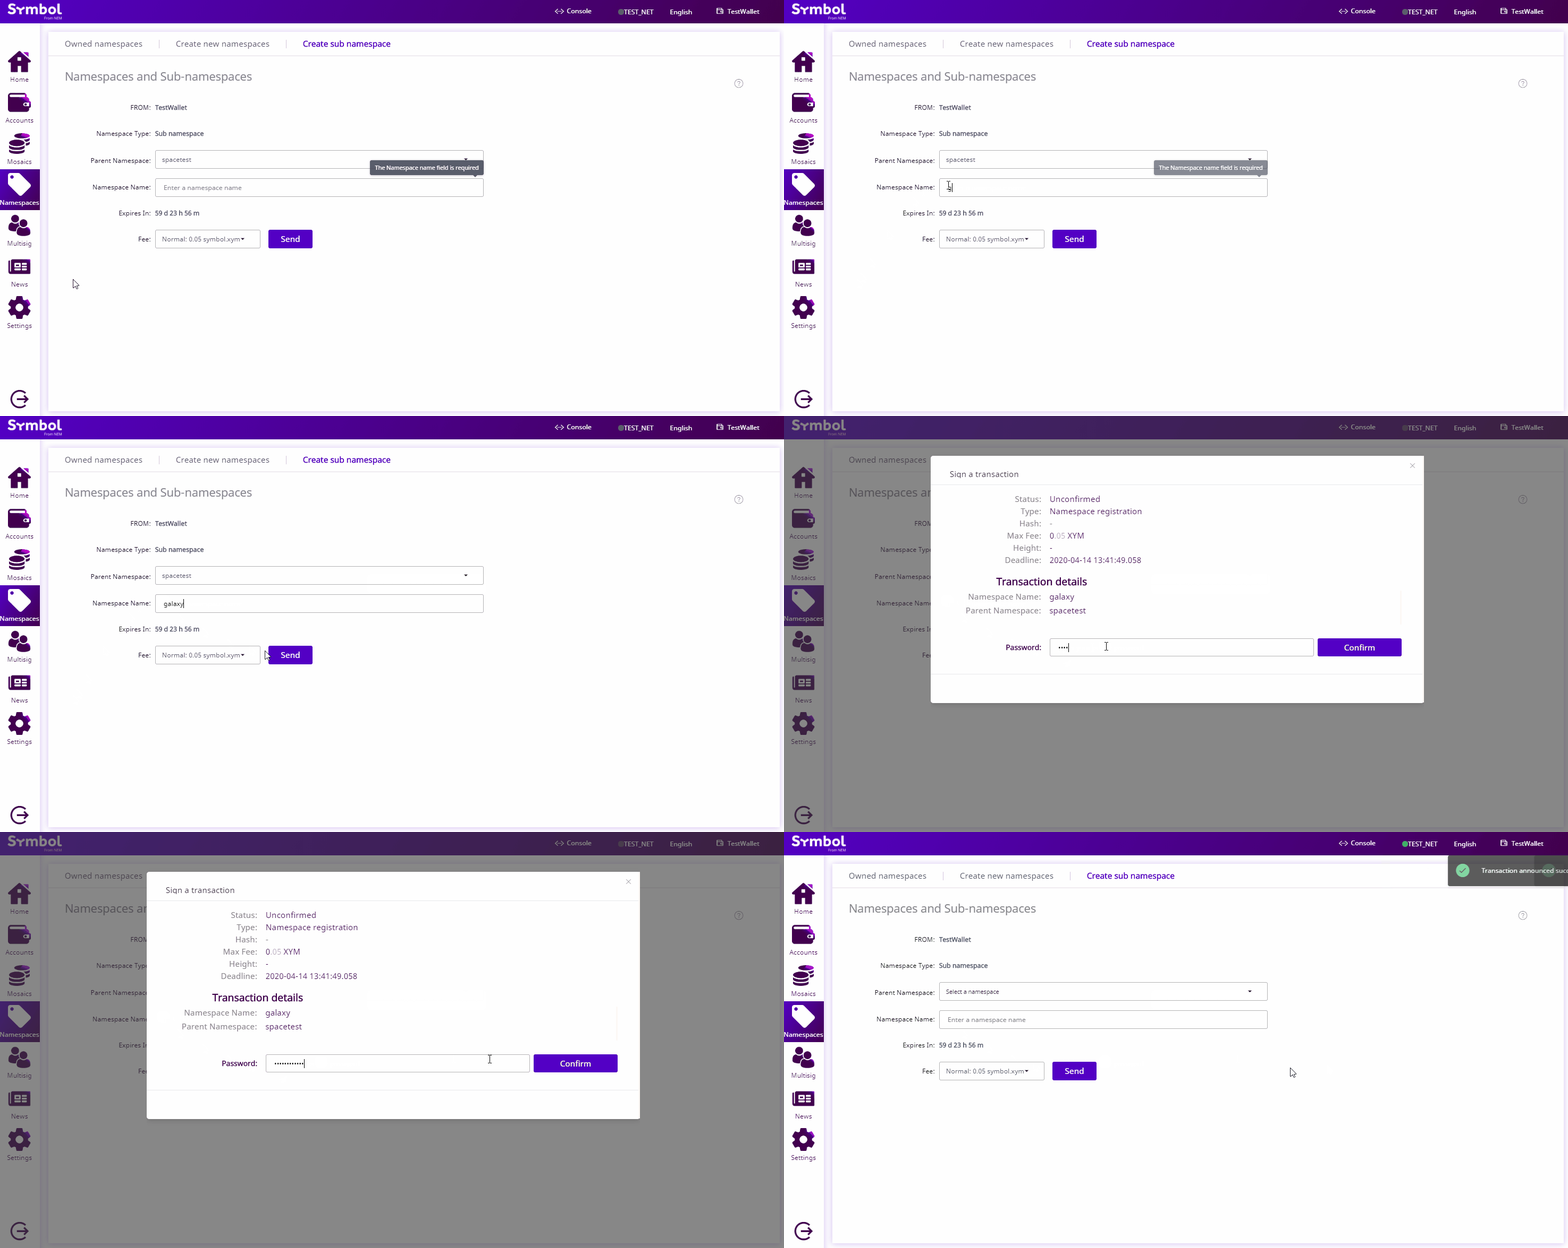
Enter information for your subnamespace. Click “Send”. Verify the information on the popup and enter your wallet password. Click “Confirm”.

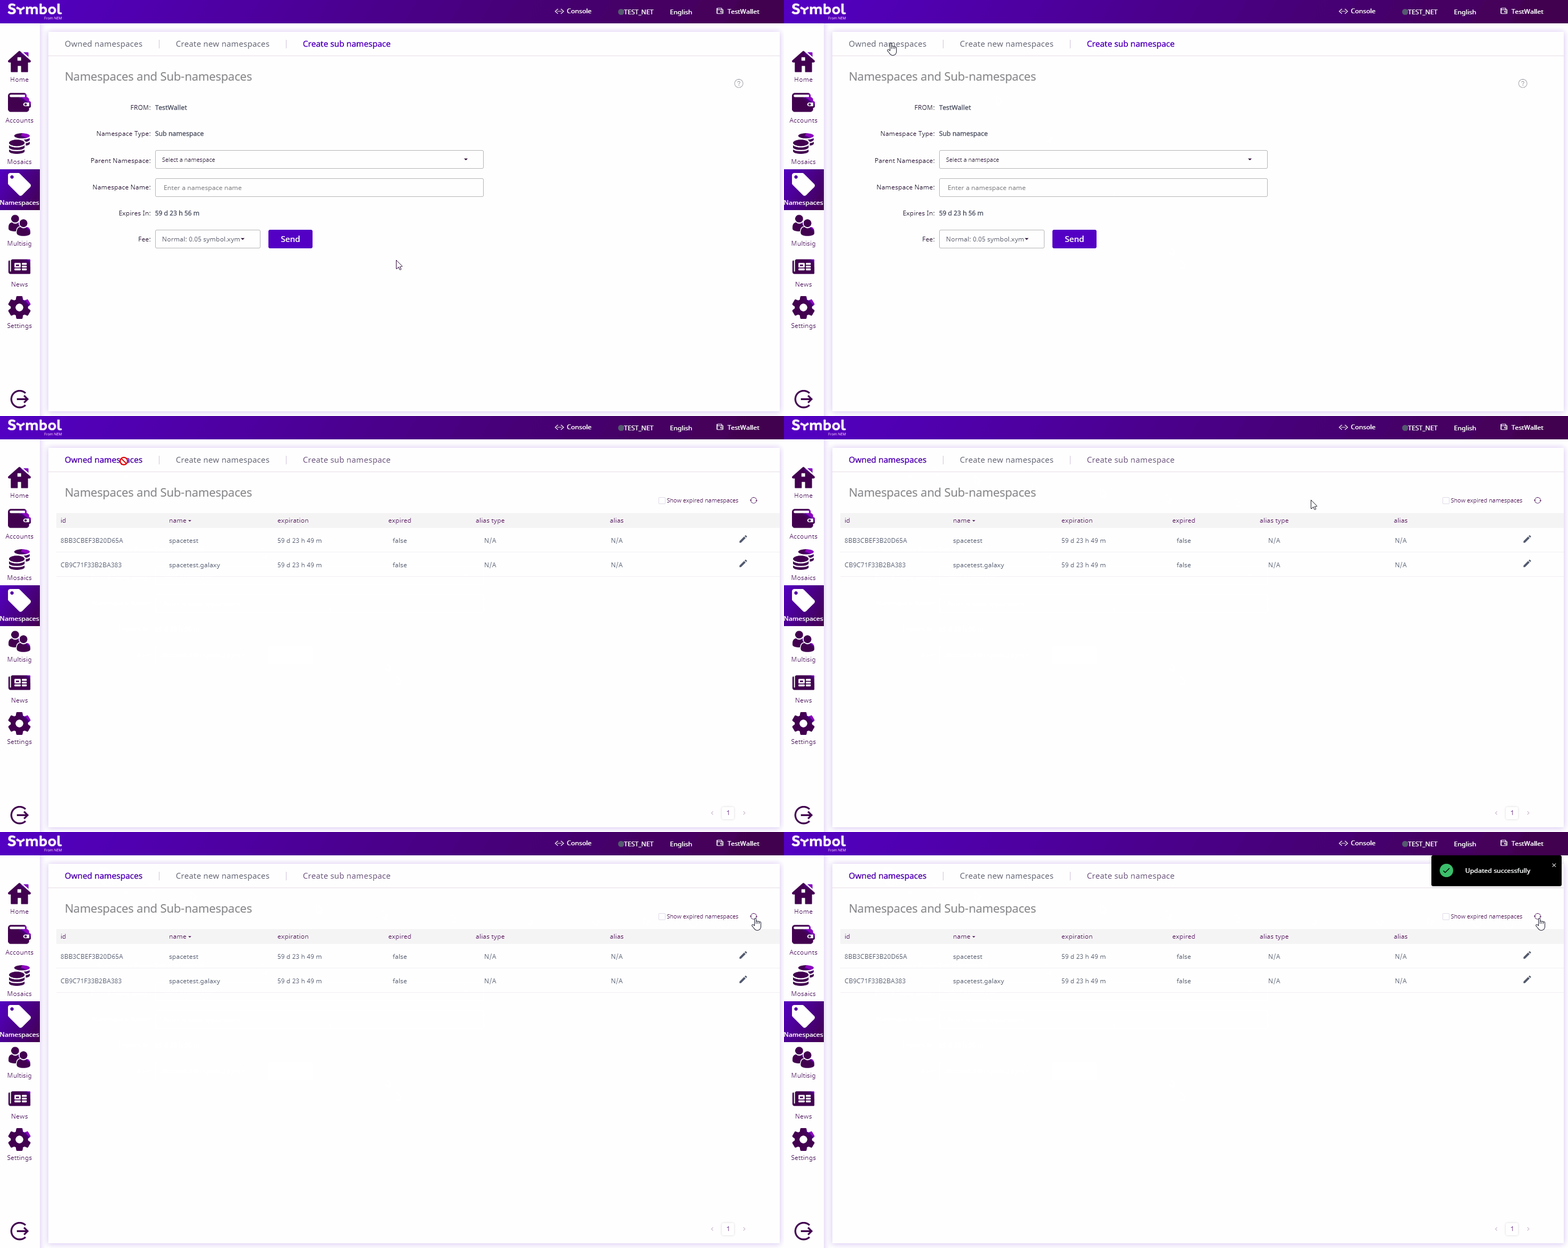
You can check that the sub namespace has been created by going back to the “Owned namespaces” tab. If the subnamespace does not show, try clicking on the update icon.

When the subnamespace is created, link the subnamespace with a mosaic or address.
The next code snippet creates a subnamespace called bar under the namespace foo.
// replace with root namespace name
const rootNamespaceName = 'foo';
// replace with root subnamespace name
const subnamespaceName = 'bar';
// replace with network type
const networkType = NetworkType.TEST_NET;

const namespaceRegistrationTransaction = NamespaceRegistrationTransaction.createSubNamespace(
  Deadline.create(epochAdjustment),
  subnamespaceName,
  rootNamespaceName,
  networkType,
  UInt64.fromUint(2000000),
);

// replace with private key
const privateKey =
  '1111111111111111111111111111111111111111111111111111111111111111';
const account = Account.createFromPrivateKey(privateKey, networkType);
// replace with meta.networkGenerationHash (nodeUrl + '/node/info')
const networkGenerationHash =
  '1DFB2FAA9E7F054168B0C5FCB84F4DEB62CC2B4D317D861F3168D161F54EA78B';
const signedTransaction = account.sign(
  namespaceRegistrationTransaction,
  networkGenerationHash,
);
// replace with node endpoint
const nodeUrl = 'NODE_URL';
const repositoryFactory = new RepositoryFactoryHttp(nodeUrl);
const transactionHttp = repositoryFactory.createTransactionRepository();

transactionHttp.announce(signedTransaction).subscribe(
  (x) => console.log(x),
  (err) => console.error(err),
);
// replace with root namespace name
const rootNamespaceName = 'foo';
// replace with root subnamespace name
const subnamespaceName = 'bar';
// replace with network type
const networkType = symbol_sdk_1.NetworkType.TEST_NET;
const namespaceRegistrationTransaction = symbol_sdk_1.NamespaceRegistrationTransaction.createSubNamespace(
  symbol_sdk_1.Deadline.create(epochAdjustment),
  subnamespaceName,
  rootNamespaceName,
  networkType,
  symbol_sdk_1.UInt64.fromUint(2000000),
);
// replace with private key
const privateKey =
  '1111111111111111111111111111111111111111111111111111111111111111';
const account = symbol_sdk_1.Account.createFromPrivateKey(
  privateKey,
  networkType,
);
// replace with meta.networkGenerationHash (nodeUrl + '/node/info')
const networkGenerationHash =
  '1DFB2FAA9E7F054168B0C5FCB84F4DEB62CC2B4D317D861F3168D161F54EA78B';
const signedTransaction = account.sign(
  namespaceRegistrationTransaction,
  networkGenerationHash,
);
// replace with node endpoint
const nodeUrl = 'NODE_URL';
const repositoryFactory = new symbol_sdk_1.RepositoryFactoryHttp(nodeUrl);
const transactionHttp = repositoryFactory.createTransactionRepository();
transactionHttp.announce(signedTransaction).subscribe(
  (x) => console.log(x),
  (err) => console.error(err),
);
To create a subnamespace, open a terminal window and run the following command.
Replace foo with the root namespace name and bar with the new subnamespace to be created.
symbol-cli transaction namespace --subnamespace --parent-name foo --name bar