This guide walks you through the process of setting up a node to join Symbol’s network without using Symbol Bootstrap.
Symbol Bootstrap is a very handy tool that allows the quick deployment of Symbol nodes. However, it relies on Docker and node.js technology which might not be available (or allowed) in all scenarios. This guide takes the longer route and explains how to setup a Symbol node manually. If you would like to use Symbol Bootstrap use this guide instead.
The following section explains how to build a Peer node and the next one expands the node to convert it into an API node.
Note
The following instructions have only been verified to work on Linux.
A Symbol node requires a number of keys to function properly. These keys are generally randomly generated so you need to create a few ones to be used in the following steps.
This step can be performed on an offline machine for added security.
Main, Remote and VRF
From within the _build directory you created in the previous section, run:
Each block is a key pair (there is one block shown above) composed of a privatekey, a publickey and an address.
Copy all of them to a temporary text file for later use and label the key pairs Main, Remote and VRF.
Note
If you already have any of these keys, you can use them instead of the randomly-generated ones.
The most relevant scenario is when using a main account opted-in from a NIS1 account. In this case you can directly use the key obtained in the opt-in process as your Main key instead of the randomly-generated one.
Voting
If your node is to be a voting node it must have linked a voting key for the period in which you intend to vote. This is interesting as voting nodes receive voting rewards.
The generation of the voting key, though, is a bit more complex than the previous ones:
Still from within the _build directory create another directory called votingkeys.
Create the voting key (or keys):
Voting keys are different from the other keys in that they have a period of validity, for example. They are only valid from a Start Epoch to an End Epoch (see side box).
Nodes are only eligible as voters if they are linked to a valid voting key for the current blockchain epoch, so remember to renew your voting key periodically.
To help you with that task, you can have up to 3 linked voting keys, with different periods, so you can easily renew one key while there’s still another one active (you will need to unlink an older key to be able to link more than 3 keys).
A voting key is created using catapult.tools.votingkey and providing its period of validity (note you do not use catapult.tools.addressgen as before):
This creates a file named votingkeys/private_key_tree1.dat and prints the voting key on the terminal. As your voting keys expire and you create new ones, increase the number on the file name.
generating 361 keys, this might take a while
votingkeys\private_key_tree1.dat generated
verifying generated file
 saved voting public key: ****************
loaded voting public key: ****************
Copy the voting key public key into the temporary text file where you keep the rest of the keys, label it Voting and save it for later.
Configuration
Symbol is highly customizable and this means there are a lot of parameters that can be adjusted to suit your node’s needs. Some of these parameters are network-related and must match the rest of nodes in the network (for example currencyMosaicId) whereas some others are node-related and you can set freely (for example friendlyName).
You should now have at least the following files in the certificates folder: ca.pubkey.pem, ca.crt.pem, node.full.crt.pem, node.crt.pem and node.key.pem.
Create harvester and VRF key files.
Create a file named private.harvesting.txt and put the Remote private key inside.
Create a file named private.vrf.txt and put the VRF private key inside.
Run the configurator tool.
The node configurator tool is called generator.py and it accepts a number of parameters depending on the kind of node you want:
Parameter
Description
--mode
(Mandatory) Type of node. Accepted values are api, peer and dual.
--harvesting
(Optional) To create a harvesting node. The Remote key will automatically be used so that Remote harvesting is enabled by default.
--voting
(Optional) To create a voting node. If you enable this copy the private_key_tree1.dat file you created above into this directory.
--output
(Optional) Folder where resulting configuration will be stored.
For example:
python3 generator.py --mode dual --harvesting --voting --output settings
  i     | extracting nemesis seed
  i     | preparing base settings
  i     | turning on harvesting
  i     | turning on voting
  i     | extracting mongo scripts
  i     | copying certificates
  i     | moving private_key_tree1.dat
This command will produce all the required node configuration files in the settings directory and you need to copy them to _build, in the machine where your node will run:
Copy settings/resources to _build/resources.
Copy settings/certificates to _build/certificates.
Copy settings/nemesis/seed to _build/seed (Omit the nemesis part).
Edit config-user.properties.
Go back to the _build directory.
Edit resources/config-user.properties so that it points to the right places:
You should see a lot of debug output while the node starts synchronizing with the rest of the network:
... peer returned 42 blocks (heights 2 - 43)
The node can be stopped by pressing Ctrl-C and restarted simply by running catapult.server again.
If you see no error messages, your client is up and running and you can continue with this guide.
Link the keys
The client is now running but it will not be able harvest because a number of keys need to be linked to it. These links are created through transactions announced to the network.
These transactions can be announced from ANY machine. In particular, this can be done from a machine other than the one running your node so your main account’s private key is never stored on the node.
You will use the symbol-cli tool for this. Installsymbol-cli by running:
npminstall--globalsymbol-cli
All transactions will be sent from (and the Fees paid by) your main account, so you need to tell symbol-cli about it by creating a profile.
Note
This profile will contain your main account’s private key in encrypted form. A password will be requested every time it is accessed.
The profile is stored in ~/symbol-cli.config.json. You can remove this file once you are done using symbol-cli.
Your node’s API server is not running yet (this will be done later) so you cannot use it to announce transactions. Fortunately, you have a list of available API nodes in the network in ../resources/peers-api.json.
Open this file and pick any of the hosts listed in the lines starting with "host":. You will use this in the next command instead of HOST.
Run:
$ symbol-cli profile import --network MAIN_NET --url http://HOST:3000 --default
✔ Enter a profile name: ... Main
✔ Enter your wallet password: ... *********
✔ Select an import type: › PrivateKey
✔ Enter your account private key: ... ********************************
Enter a name for your profile (for example, Main).
Enter a password to protect the profile.
Select PrivateKey as the import type.
Enter your Main private key.
The profile information is stored (encrypted) in ~/symbol-cli.config.json and symbol-cli is now ready to use.
Note
All the key links created in the next subsections can be undone at any time by announcing an equivalent unlink transaction (--actionUnlink). Therefore you can always mend any mistake or change your node configuration (Each transaction has a fee, though).
Remote key
You configured the node to sign created blocks using the Remote key, but the harvesting fees should go to your Main account. This is accomplished by announcing an AccountKeyLinkTransactionV1:
symbol-cli transaction accountkeylink --sync --action Link \
           --max-fee 1000000 --mode normal
✔ Enter your wallet password: ... *********
✔ Enter the public key of the remote account:  ********************************
Enter your profile password.
Enter your Remote public key.
...
✔ Do you want to announce this transaction? ... yes
SUCCESS Transaction announced
SUCCESS Transaction confirmed
symbol-cli transaction vrfkeylink --sync --action Link \
                       --max-fee 1000000 --mode normal
✔ Enter your wallet password: ... *********
✔ Enter the public key to link: ... ********************************
Enter your VRF public key.
Voting key
If your node is to be a voting node it must link the voting key you generated above. The link is accomplished by announcing a VotingKeyLinkTransactionV1:
symbol-cli transaction votingkeylink --sync --action Link \
            --max-fee 1000000 --mode normal
✔ Enter your wallet password: ... *********
✔ Enter the public key of the voting key account:  ****************
✔ Enter the start point: ... 100
✔ Enter the end point: ... 460
Enter your profile password.
Enter the voting public key you obtained previously.
Enter the Start and End epochs you used when creating the voting key.
...
✔ Do you want to announce this transaction? ... yes
SUCCESS Transaction announced
SUCCESS Transaction confirmed
When the next epoch starts, if it is inside the Start and End epochs of one of your registered keys, your node should participate in the finalization process and collect voting rewards.
Note
Every epoch, more than 67% of all eligible voting nodes need to cast their votes or finalization stalls.
Therefore, if you are planning to take your node offline for a long time it is important that you unlink your voting keys for that period so that finalization is not affected.
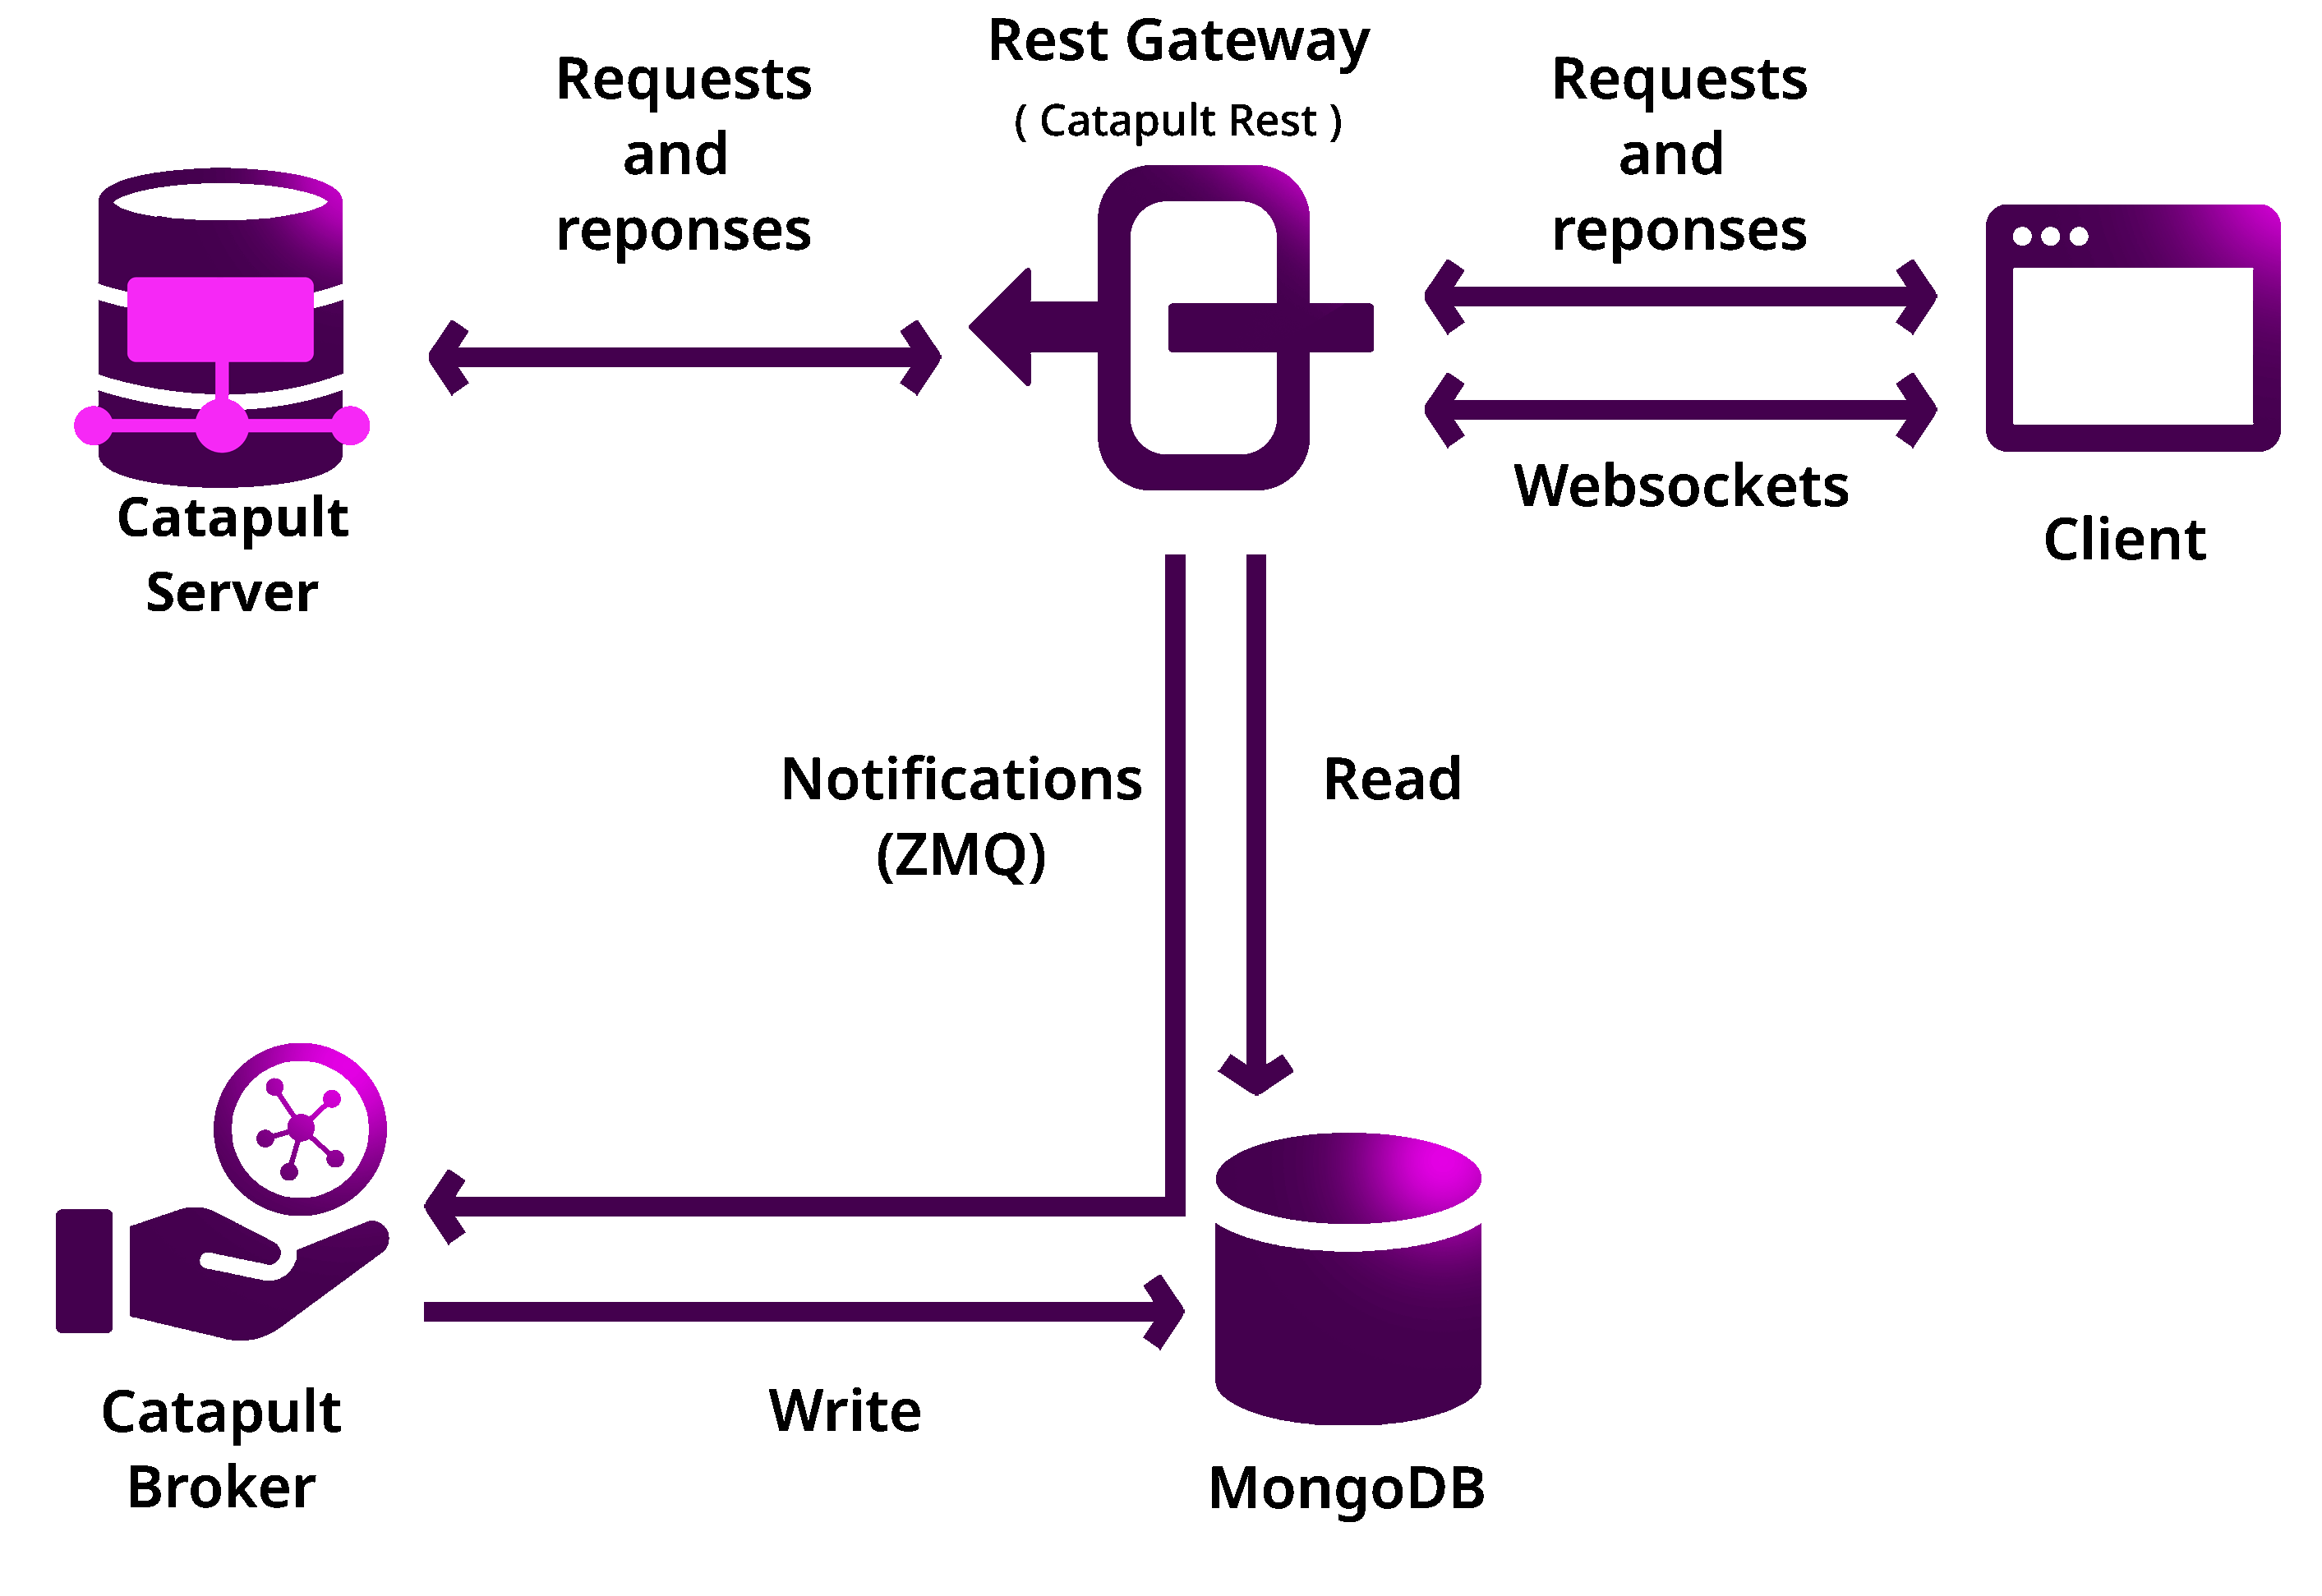
Build an API node
Once you have the Catapult client running, you can add extra services to turn it into an API node:
As shown in the diagram above, besides the Catapult client you will also need:
A Database holding the REST data.
A Catapult Broker serializing accesses to the database.
A REST gateway accepting requests and turning them into Catapult client commands or database queries.
The following sections explain how to install each service. You will need all of them.
Move to the _build folder created while building the client and create any additional folders requested in the next steps inside _build.
Keep the REST gateway running for as long as your node runs.
Verification
If the REST gateway is working correctly, you can now make queries at port 3000. If the Catapult client, Broker and MongoDB are working correctly, the values returned by REST will be correctly synchronized with the rest of the blockchain.
Point a browser to the following URLs and check that the returned values are similar to the expected ones: